
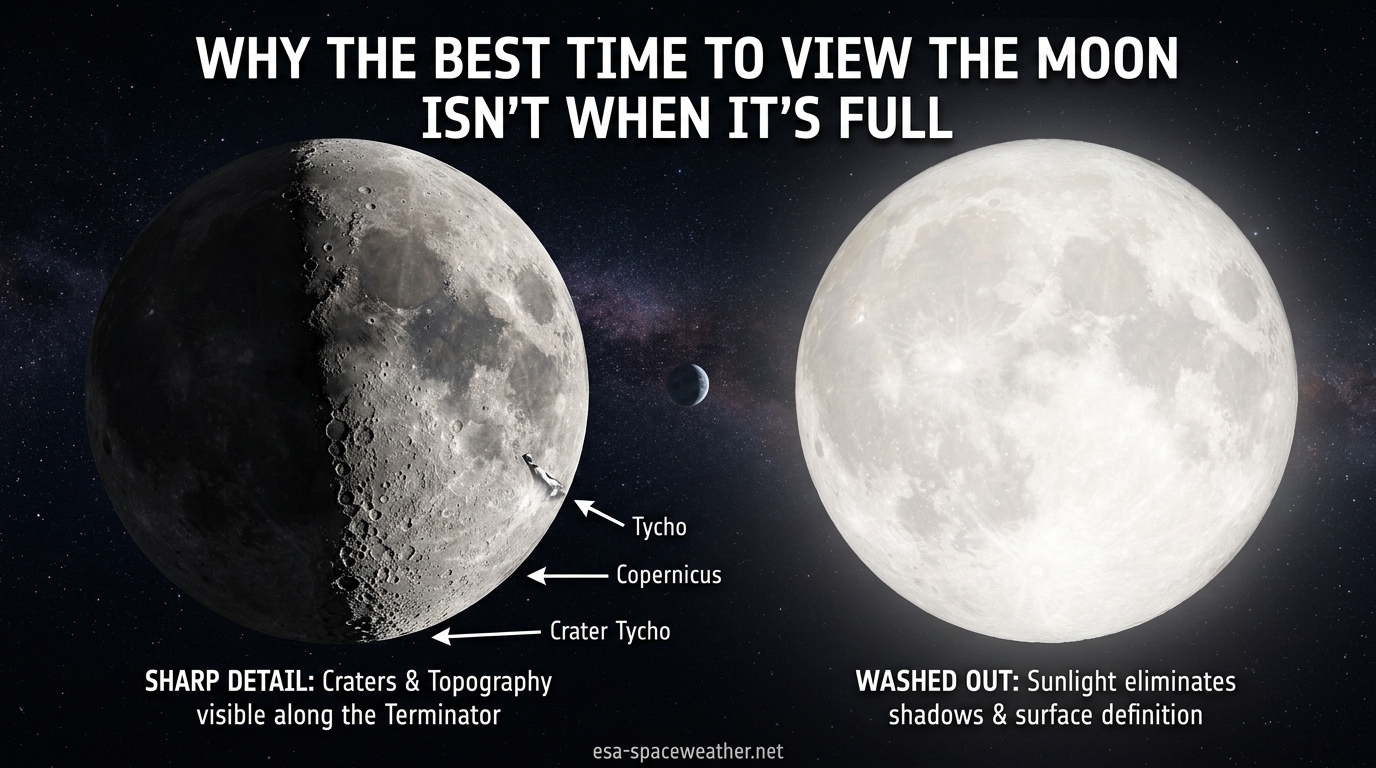
Most people assume the full moon is the perfect moment to explore the lunar surface. It is the brightest, most dramatic, and most photographed phase we see in the night sky. But here is the counterintuitive truth that every experienced amateur astronomer knows: the full moon is actually the worst possible time to observe the moon’s surface features.
The best time to view the moon is during its first quarter or last quarter phase, when the sun’s light strikes the lunar surface at a dramatic angle. This sideways illumination casts long, deep shadows across every crater, mountain range, and valley. At these phases, the moon transforms from a flat, washed-out disc into a breathtaking three-dimensional world with stunning surface relief.
I have spent years doing lunar observation from my backyard, and I still remember the first time I pointed my telescope at a first quarter moon instead of a full one. The difference was staggering. Craters I never knew existed suddenly jumped out in sharp relief. Mountain ranges cast shadows that stretched for dozens of miles across the gray plains. It looked like a completely different world.
In this guide, I will explain exactly why the best time to view the moon is not during its full phase, what the lunar terminator is, and how to plan your observing sessions around the phases that deliver the most spectacular views. Whether you are using just your eyes, a pair of binoculars, or a backyard telescope, this information will change how you look at our nearest celestial neighbor.
Table of Contents
The Short Answer: When Is the Best Time to View the Moon?
The best time to view the moon is during its first quarter and last quarter phases. These occur roughly one week before and one week after the full moon, respectively. During these phases, the moon is half-illuminated from our perspective, and sunlight hits the surface at a low angle that produces dramatic shadows.
Here is the quick ranking of all eight lunar phases for surface observation quality:
- First Quarter Moon – Best overall: high in the evening sky, perfect shadow angles, ideal terminator position
- Last Quarter Moon – Second best: pre-dawn sessions with often steadier atmospheric conditions
- Waxing Gibbous – Good: terminator covers rich highland regions, but bright overall
- Waning Gibbous – Good: terminator sweeps across western features late at night
- Waxing Crescent – Fair: earthshine adds beauty, but limited illuminated surface area
- Waning Crescent – Fair: similar to waxing crescent, visible before dawn
- Full Moon – Worst for detail: completely flat lighting, no shadows, washed-out surface
- New Moon – Not applicable: moon is not visible, but ideal for deep-sky observing
The golden window for lunar observation runs from about three days after new moon through about two days past first quarter. This roughly ten-day stretch offers the best combination of good lighting, convenient evening viewing hours, and steadily increasing detail as the terminator marches across the surface.
Why the Full Moon Is Actually the Worst Time for Lunar Observation
At full moon, sunlight hits the lunar surface almost directly from our line of sight. The sun is effectively behind us, shining straight onto the face of the moon. This means every crater, mountain, and ridge is lit from above with zero angle. Without angled light, there are no shadows. Without shadows, there is no depth perception.
Think about taking a photo of a face directly under a camera flash mounted on the camera itself. Every feature gets flattened. Wrinkles, pores, and contours disappear because the light fills in all the shadows. The same physics applies to the moon at full phase. The result is a brilliant but featureless disc where craters vanish, mountain ranges disappear, and the entire surface looks like a flat, bright wall.
This is why so many beginners feel disappointed when they finally point a telescope at a full moon. They expect to see the dramatic cratered landscapes from NASA photographs. Instead, they see a blindingly bright circle with almost no visible detail. The features are all still there, but the lighting hides them completely.
The Opposition Surge: Why the Full Moon Is So Unusually Bright
There is a fascinating scientific reason why the full moon appears so much brighter than we would expect. It is called the opposition surge, also known as the opposition effect. When the sun is directly behind the observer (Earth), the moon reflects light back toward the source much more efficiently than at any other angle.
Two mechanisms drive this phenomenon. The first is shadow-hiding: at full phase, every tiny shadow cast by rocks, grains, and surface irregularities is hidden directly behind the object that created it. From our vantage point, the surface looks shadow-free. The second is backscattering: the moon’s rough, dusty regolith reflects light preferentially back toward the direction it came from.
The result is that the full moon can appear 30 to 40 percent brighter than we would predict based on its albedo alone. This brilliant glow is exactly what makes surface detail impossible to see. The opposition surge is beautiful for naked-eye appreciation and moonlit walks, but it is the enemy of detailed lunar observation.
One additional problem at full moon is sheer brightness through a telescope. The moon at full phase delivers enough concentrated light through a telescope eyepiece to cause eye strain and reduce your ability to detect subtle features. Many observers use a moon filter specifically to tame this brightness, but even with a filter, the flat lighting remains the fundamental limitation.
Understanding the Lunar Terminator: Where All the Detail Lives
The lunar terminator is the single most important concept in amateur lunar observation. Simply put, the terminator is the dividing line between the illuminated portion of the moon and the dark portion. It is the sunrise or sunset line on the lunar surface, and it is where every observer should focus their attention.
Along the terminator, the sun is either rising or setting on the moon. Sunlight skims across the surface at an extremely low angle. Every crater wall, every mountain peak, and every ridge casts a long, dramatic shadow. Features that are completely invisible at full moon suddenly stand out in bold, three-dimensional relief along this line.
I think of the terminator as a continuously moving spotlight that sweeps across the moon over the course of each 29.5-day lunar cycle. On a waxing moon, the terminator marks where lunar sunrise is happening. On a waning moon, it marks where lunar sunset is occurring. Either way, this is where the observing action is.
How to Find the Terminator
Finding the terminator is straightforward. On a first quarter moon, the terminator runs straight down the middle of the visible disc, dividing the lit right half from the dark left half (for observers in the Northern Hemisphere). On a waxing crescent, it curves across the right portion of the disc. On a last quarter moon, it divides the lit left half from the dark right half.
The terminator moves across the surface at a rate of roughly 9.6 miles per hour, which means it takes about two weeks to sweep from one edge of the moon to the other. Even in a single observing session of an hour or two, you can watch features emerge from darkness as the terminator advances. Crater walls that were in shadow at the start of your session will be catching the first rays of lunar sunrise by the time you pack up.
This is what makes following the terminator so rewarding. You are watching real geological features emerge from darkness in real time. The play of light and shadow changes noticeably over the course of an evening, and new features appear at the terminator every single night of the cycle.
What You See Along the Terminator vs. Away from It
To understand the difference, consider two craters. One sits directly along the terminator, where sunlight just grazes the surface. Its interior is still in shadow while its rim catches the first light. You see a perfect ring of light with a dark interior, and the shadow of its rim stretches across the surface like a sundial. You can judge its depth, see terraced walls, and even spot central peaks catching morning light.
Now consider the same crater on the fully illuminated side of the moon. The entire crater floor is lit, the walls are lit, and the surrounding terrain is lit. With light coming from directly overhead, the crater becomes nearly invisible. It blends into the surrounding surface like a shallow depression on a flat surface. This is exactly what happens to every feature on the moon during full phase.
This is why experienced observers spend virtually all their time along the terminator and ignore the fully lit portion. The terminator is where the moon reveals its secrets.
Moon Phases Ranked: Which Is Best for Observation
The moon goes through eight distinct phases during each 29.5-day lunar cycle. Not all phases are created equal when it comes to surface observation. Let me break down each phase and explain what you can expect to see.
1. First Quarter Moon: The Observing Champion
The first quarter moon is hands-down the best phase for lunar observation. The moon is half-illuminated (the right side from the Northern Hemisphere), the terminator runs straight down the middle, and the timing is perfect for evening viewing. First quarter moon typically rises around noon, reaches its highest point around sunset, and sets around midnight.
This means you get convenient evening hours with the moon high in the sky, which reduces atmospheric distortion. The terminator at first quarter sweeps through some of the most feature-rich territory on the moon, including the Mare Tranquillitatis region, the Apennine Mountains, and spectacular craters like Copernicus, Plato, and Archimedes.
Even if you can only observe the moon once in a given month, make it the first quarter phase. You will see more detail in one session than during an entire night of full moon observing.
2. Last Quarter Moon: The Pre-Dawn Jewel
The last quarter moon is the mirror image of the first quarter, with the left half illuminated. It rises around midnight, reaches its highest point around sunrise, and sets around noon. This makes it ideal for pre-dawn observing sessions.
Many experienced observers actually prefer the last quarter moon because atmospheric conditions are often steadier in the pre-dawn hours. The ground has had all night to cool down to ambient temperature, reducing the thermal turbulence that causes shimmering and blurring. The terminator at last quarter sweeps through different terrain, revealing the great crater Tycho, the vast Oceanus Procellarum, and the impressive ray systems of Copernicus and Kepler.
The tradeoff is that you need to be an early riser or a dedicated night owl. Last quarter moon viewing requires being outside between about 1:00 AM and dawn, which is not for everyone.
3. Waxing Gibbous: Rich Detail, Bright Background
The waxing gibbous phase occurs between first quarter and full moon. The moon is more than 50 percent illuminated and growing each night. The terminator has moved past the central highlands into the western portion of the near side, revealing different craters and mountain ranges each evening.
This is an excellent time for observation because you can follow the terminator across new terrain night after night. The Apollo 11 landing site in Mare Tranquillitatis becomes fully visible during this phase. The downside is that the illuminated portion of the moon is large and bright, which can make the view somewhat overwhelming in a telescope.
4. Waning Gibbous: Late-Night Riches
The waning gibbous phase occurs between full moon and last quarter. The terminator is sweeping across the eastern portion of the near side. This is a great phase for observers who enjoy staying up late, as the moon rises later each evening and the terminator reveals the rugged highlands and prominent ray craters.
The waning gibbous is particularly good for observing the crater Aristarchus, one of the brightest features on the moon, and Schickard, an enormous walled plain in the southern highlands.
5. Waxing Crescent: Earthshine and Delicate Beauty
The waxing crescent appears in the western sky shortly after sunset, just a few days after new moon. Only a thin sliver of the moon is illuminated, but the dark portion is often visible thanks to earthshine. This is light reflected off Earth that dimly illuminates the dark side of the moon.
While the illuminated area is limited, the waxing crescent is a beautiful phase for naked-eye and wide-field observation. Earthshine creates a stunning visual effect where the entire moon appears faintly visible within a bright crescent. Through binoculars, the terminator during this phase reveals the rugged southern highlands.
6. Waning Crescent: Pre-Dawn Sliver
The waning crescent mirrors the waxing crescent but appears in the pre-dawn eastern sky. Like its waxing counterpart, it offers beautiful earthshine views and limited but dramatic terminator detail along the western highlands.
This phase is particularly rewarding if you enjoy quiet, solitary observing sessions. The pre-dawn sky is often calm, the air is steady, and there is something deeply peaceful about watching a thin crescent moon rise in the gathering dawn light.
7. Full Moon: Beautiful but Featureless
I have already explained why the full moon is the worst phase for surface observation. The flat lighting from the opposition geometry eliminates shadows, and the opposition surge makes the surface blindingly bright through optics. Craters vanish, mountains disappear, and the surface looks like a uniform gray-white disc.
However, the full moon is not without observational value. It is the best phase for studying ray systems, those bright streaks of ejecta that radiate outward from young craters like Tycho, Copernicus, and Kepler. These ray systems are actually easier to see at full moon because the high-angle lighting makes bright features even brighter. The full moon is also the best phase for naked-eye appreciation, moonlit landscape photography, and cultural celebrations.
8. New Moon: Invisible but Valuable
During new moon, the moon is positioned between Earth and the sun, and its illuminated side faces away from us. The moon is essentially invisible from Earth. This is not a time for lunar observation, but it is the best time for deep-sky observing, when the absence of moonlight allows you to see faint galaxies, nebulae, and star clusters at their best.
The 29.5-Day Lunar Cycle: Timing Your Observation Sessions
The moon completes one full cycle of phases every 29.5 days. This period, known as the synodic month or lunar month, is the time it takes the moon to return to the same position relative to the sun as seen from Earth. Understanding this cycle is essential for planning your lunar observation sessions.
The cycle begins at new moon, when the moon is invisible. Over the following week, the moon grows from a thin waxing crescent to first quarter. During the second week, it continues to grow through the waxing gibbous phase to reach full moon. The third week brings the waning gibbous phase down to last quarter, and the fourth week shrinks the moon through the waning crescent back to the next new moon.
Moonrise and Moonset Timing Through the Cycle
The moon’s rise and set times shift by roughly 50 minutes each day throughout the cycle. This is because the moon moves about 12 degrees eastward in its orbit each day, so Earth has to rotate a bit further to bring the moon above the horizon.
Here is the general timing pattern:
- New Moon: Rises at sunrise, sets at sunset (invisible)
- First Quarter: Rises around noon, sets around midnight
- Full Moon: Rises at sunset, sets at sunrise
- Last Quarter: Rises around midnight, sets around noon
This timing means the first quarter moon is perfectly positioned for evening observation. It is already high in the sky when twilight fades, and it stays visible until around midnight. The last quarter moon, by contrast, requires staying up late or waking up early, but rewards you with often steadier atmospheric conditions.
Waxing vs. Waning: Which Side Is Better?
This is one of the most common questions from beginning observers, and it comes up repeatedly in astronomy forums. The answer depends on your schedule and observing preferences.
The waxing moon (growing from new to full) is visible in the evening sky. The terminator marks the line of lunar sunrise, so features along the terminator are emerging from darkness into light. This creates a sense of features appearing and growing brighter as you watch. The waxing moon is ideal for people who prefer evening observing.
The waning moon (shrinking from full to new) is visible in the morning sky and late night. The terminator marks the line of lunar sunset, so features along the terminator are sinking from light into darkness. This creates a different but equally beautiful effect, with shadows lengthening as features slip into night. The waning moon rewards early risers and dedicated night owls.
Neither side is objectively better. What matters is that you observe during the quarter phases, when the terminator is active and the shadow detail is at its peak. The choice between waxing and waning is really a choice between evening and pre-dawn sessions.
Planning a Week-Long Observing Session
One of the most rewarding ways to experience the moon is to follow it over multiple consecutive nights. Try observing the waxing moon from about three days after new moon through first quarter and a few days beyond. Over the course of about ten nights, you will watch the terminator sweep across the entire visible surface, revealing different features each evening.
On night one, you will see the rugged southern highlands emerging into view. By night three or four, the great mare regions begin to appear. Around first quarter, the terminator reveals the Apennine Mountains, the crater Plato, and the majestic Archimedes. A few days later, the terminator sweeps past Copernicus and Kepler with their spectacular ray systems.
This successive-night approach is one of the best ways to truly learn the lunar surface. By watching features emerge and change night after night, you develop an intuitive understanding of the moon’s geography that no single session can provide. Multiple experienced observers on astronomy forums cite this as their single favorite lunar observing activity.
What You Can See at Each Phase: A Feature Guide
The moon has more than 3,000 named craters, vast volcanic plains, towering mountain ranges, and deep valleys. Knowing which features are best seen at which phases will help you plan your sessions for maximum impact.
Craters Along the Terminator
Tycho is one of the most impressive craters on the moon, located in the southern highlands. It is about 53 miles in diameter and has a spectacular ray system that makes it one of the brightest features on the full moon. The best time to see Tycho’s actual crater structure is when the terminator passes through the southern highlands, which happens during the waning gibbous and last quarter phases. At the terminator, you can see Tycho’s terraced walls, central peak, and deep interior.
Copernicus is often called the most beautiful crater on the moon. Located in the Oceanus Procellarum, it spans 58 miles and features a complex central peak cluster. Copernicus is best observed when the terminator sweeps through the central region of the moon, which occurs around the waxing gibbous and first quarter phases. At the terminator, Copernicus shows stunning terraced walls and a shadow-filled interior that looks like a deep bowl.
Plato is a large, dark-floored crater on the northern edge of Mare Imbrium. It is about 63 miles across with a remarkably smooth, dark floor. Plato is best viewed when the terminator is nearby, around the first quarter phase. The contrast between Plato’s dark floor and the bright surrounding highlands is one of the most striking sights on the moon.
Clavius is an enormous walled plain in the southern highlands, measuring about 140 miles in diameter. It is famous for a curving arc of progressively smaller craters across its floor. Clavius is best observed during the last quarter and waning gibbous phases, when the terminator lights up its massive walls and reveals its interior crater chain.
The Maria: Ancient Lava Plains
The maria (Latin for seas) are vast, dark plains formed by ancient volcanic activity. These are the dark patches visible to the naked eye. Through a telescope or binoculars, each mare has its own character and surrounding features.
Mare Tranquillitatis (Sea of Tranquility) is where Apollo 11 landed. It is visible during the waxing phases, particularly around first quarter. Look for the smooth, dark floor and the small crater Arago near its western edge.
Mare Imbrium (Sea of Rains) is one of the largest maria, visible during the waxing gibbous phase. Its southeastern rim is defined by the spectacular Apennine Mountains, one of the most dramatic ranges on the moon.
Mare Serenitatis (Sea of Serenity) is a nearly circular mare visible during the first quarter and waxing gibbous phases. Its dark, smooth floor provides a beautiful contrast to the surrounding highlands.
Mare Crisium (Sea of Crises) is a small, isolated mare near the eastern edge of the visible disc. It is one of the first major features to appear after new moon and is visible during the waxing crescent and early first quarter phases.
Oceanus Procellarum (Ocean of Storms) is the largest dark plain on the moon, visible during the waxing gibbous and full phases. It contains the craters Copernicus and Kepler, as well as the Aristarchus plateau.
Mountain Ranges and Valleys
The Montes Apenninus (Apennine Mountains) form the southeastern rim of Mare Imbrium and are arguably the most impressive mountain range on the moon. Some peaks rise more than 15,000 feet above the surrounding plain. They are best observed around first quarter, when the terminator lights them from the side and casts dramatic shadows across the mare floor.
Vallis Alpes (Alpine Valley) is a straight valley cutting through the mountains between Mare Imbrium and Mare Frigoris. It is about 80 miles long and visible in modest telescopes at first quarter. A narrow rille runs down its center that challenges observers with larger scopes.
Rupes Recta (Straight Wall) is a remarkable linear fault about 68 miles long in the southern highlands. When the terminator passes it at first quarter, it appears as a striking dark line across the surface. It is one of the most distinctive individual features on the moon.
Apollo Landing Sites
You cannot see the Apollo landing equipment from Earth, even in the largest telescopes. The descent stages left behind are only about 10 feet across, and the moon is nearly 240,000 miles away. However, you can identify the landing locations and observe the terrain that the astronauts explored.
Apollo 11 landed in Mare Tranquillitatis, a smooth, dark plain. This region is visible during the waxing crescent and first quarter phases.
Apollo 15 landed near the Apennine Mountains and Hadley Rille, one of the most geologically diverse landing sites. This area is spectacular at first quarter when the Apennines are lit from the side.
Apollo 17 landed in the Taurus-Littrow valley, near the southeastern edge of Mare Serenitatis. This region is best viewed during the waxing gibbous phase.
Pointing out these locations during your observing sessions adds a powerful human dimension to lunar observation. You are looking at the exact spots where humans walked, drove, and conducted science on another world.
Earthshine: The Hidden Beauty of the Crescent Moon
During the thin crescent phases, look at the dark portion of the moon. You will often see the entire disc faintly illuminated, not by direct sunlight but by sunlight reflected off Earth. This phenomenon is called earthshine, and it creates one of the most beautiful sights in the sky.
Earthshine is best seen during the waxing crescent (a few days after new moon) and waning crescent (a few days before new moon). The crescent is bright and direct, while the rest of the moon glows with a soft, ghostly blue-gray light. Through binoculars, you can see major features on the earthlit portion, including the dark maria and some of the larger craters.
Interestingly, earthshine is slightly brighter in the Northern Hemisphere’s spring because the Arctic ice cap (a highly reflective surface) is tilted toward the moon during those months. This is a subtle detail that dedicated observers enjoy tracking.
Equipment for Lunar Observation: What You Actually Need
One of the great things about lunar observation is that it does not require expensive equipment. The moon is close, large, and bright enough that even modest tools reveal spectacular detail. Here is a breakdown of what works at each level.
Naked Eye Observation
Even without any equipment, the moon rewards careful observation. You can easily identify the major maria as dark patches, follow the changing phases over the 29.5-day cycle, and watch the moon’s position shift against the background stars. Try identifying the “man in the moon” pattern and tracking how it changes with the phases.
Naked eye observation is also the best way to appreciate earthshine during crescent phases and to observe the moon’s conjunctions with bright planets and stars throughout the year.
Binoculars: The Best Starter Tool
If you are just getting started with lunar observation, buy binoculars before a telescope. A good pair of 7×50 or 10×50 binoculars will reveal dozens of craters, the major maria, and dramatic terminator detail. Binoculars are also portable, easy to use, and relatively inexpensive.
The forum consensus among experienced amateur astronomers is overwhelmingly in favor of 7×50 binoculars as the ideal starter tool for moon observation. They offer a wide field of view that shows the entire moon at once, with enough magnification to reveal major surface features along the terminator.
When using binoculars, brace your elbows on a stable surface or lean against a wall to reduce hand shake. Even a small tripod with a binocular mount will dramatically improve your views.
Telescopes: Unlocking the Details
A telescope opens up a completely new level of lunar detail. Even a small 60mm refractor or 4.5-inch reflector will reveal hundreds of craters, individual mountain peaks, rilles, and fault lines. Larger telescopes (6 inches and above) show ever-finer detail, including crater terracing, central peaks, and small secondary craters.
Here is a magnification guide for telescopic lunar observation:
- 30x to 50x: The entire moon fits in view. Great for orientation and context.
- 75x to 100x: The best all-around lunar magnification. Crater detail is excellent, and the image is bright and sharp.
- 150x to 200x: High-detail work along the terminator. Individual crater walls and central peaks become clear.
- 250x and above: Maximum detail on specific features. Requires excellent atmospheric conditions and steady air.
The most common beginner mistake is using too much magnification. High magnification amplifies atmospheric turbulence and produces blurry, shaking views. Start low, find your target, and increase magnification only when the image is sharp and steady at lower powers.
A common recommendation from experienced observers is to use a small, high-quality refractor (2.4 to 4 inches) for lunar work. Refractors produce high-contrast images with no central obstruction, which is ideal for the bright lunar surface. Reflectors from 4.5 to 8 inches are also excellent choices.
Moon Filters: Do You Need One?
A moon filter is a screw-on attachment for your telescope eyepiece that reduces the brightness of the moon. It works like sunglasses for your telescope. There are two main types: neutral density filters (which simply reduce light) and variable polarizing filters (which let you adjust brightness).
For observing near full moon, a moon filter is genuinely helpful. The full moon is so bright through a telescope that it can cause eye strain and wash out subtle detail. A filter reduces the glare to a comfortable level.
However, during the quarter phases (the best time to view the moon), a filter is usually unnecessary. The half-illuminated moon is bright but not painfully so, and the detail along the terminator benefits from maximum light transmission. If you buy a filter, choose a variable polarizing filter so you can adjust the brightness to match the phase and magnification you are using.
Apps and Tools for Planning Sessions
Several free and low-cost tools make lunar observation much easier to plan. NASA’s Dial-A-Moon tool shows you the exact appearance of the moon for any date and time, including the terminator position. SkySafari and Stellarium are excellent planetarium apps that show moon phase, rise/set times, and which features are along the terminator on any given night.
I recommend checking one of these tools before each session to identify which features will be best placed along the terminator. This turns a random scanning session into a focused feature hunt.
Atmospheric Conditions: Why Some Nights Are Better Than Others
The moon’s phase is the most important factor in lunar observation, but atmospheric conditions come a close second. Even at the perfect first quarter phase, a night of turbulent air will produce blurry, shimmering views. Understanding how the atmosphere affects your observations will help you pick the best nights.
What Is Astronomical Seeing?
Astronomical seeing refers to the steadiness of the atmosphere as it affects telescopic views. When the air is calm and stable, stars look like tiny pinpoints and lunar features appear sharp and crisp. When the air is turbulent, stars twinkle violently and the moon appears to boil or shimmer in the eyepiece.
Turbulence is caused by temperature differences in the atmosphere. Warm air rising from heated ground, jet stream winds at high altitude, and temperature gradients between your telescope and the surrounding air all contribute to poor seeing.
Best Conditions for Sharp Lunar Views
The best lunar views come on nights with calm, stable air. Cool, dry nights tend to offer the steadiest conditions, particularly when there has been no recent temperature swing. Pre-dawn hours often have the best seeing because the ground has had all night to reach thermal equilibrium with the air above it.
Hot summer nights are notoriously bad for lunar observation. Heat radiating from rooftops, pavement, and the ground creates rising columns of warm air that distort the view. Winter nights, while cold, often deliver sharper images because the air is denser and more stable.
If you see the moon shimmering or dancing with your naked eye, expect poor telescopic views. If the moon looks rock-steady and the stars barely twinkle, you are in for an excellent session.
Managing Your Equipment’s Thermal Effects
Your telescope itself can create turbulence. If you bring a cold telescope from indoors into warm outside air, or vice versa, temperature differences within and around the tube will degrade the image. Give your telescope at least 30 minutes to reach ambient temperature before serious observing begins. This process is called thermal equilibration, and it makes a visible difference in image sharpness.
Fans installed on larger telescopes can accelerate cooling, but for small to medium instruments, simple patience is usually sufficient. I store my telescope in an unheated garage to minimize temperature shock when I take it outside.
Common Beginner Mistakes (And How to Avoid Them)
After years of helping newcomers get started with lunar observation, the same handful of mistakes come up repeatedly. Avoiding these will save you frustration and dramatically improve your experience.
Mistake 1: Only observing at full moon. This is the most common and most damaging mistake. If you only look at the moon when it is full, you will never see the stunning surface detail that makes lunar observation so rewarding. Always plan your sessions around the quarter phases.
Mistake 2: Using maximum magnification. More magnification is not always better. High power amplifies atmospheric turbulence and narrows your field of view. Start at 50x to 75x and increase only when the image is sharp and steady. Most lunar observing is done beautifully at 75x to 150x.
Mistake 3: Ignoring the terminator. Beginners tend to look at the fully illuminated portion of the moon because it is bright and obvious. But all the detail lives along the terminator. Make a conscious effort to spend most of your time scanning the day/night boundary.
Mistake 4: Not using an app to plan sessions. Showing up without knowing which features are along the terminator means you will miss the best targets. Spend five minutes with a moon app before each session to plan your feature list.
Mistake 5: Giving up after one disappointing session. Bad atmospheric conditions can ruin even a perfectly timed first quarter session. If the view is blurry and shimmering, try again on another night. The moon will be at a good phase for roughly half of each month, so opportunities are frequent.
FAQs
What is the best time to view the moon?
The best time to view the moon is during its first quarter or last quarter phase, when the moon is half-illuminated. During these phases, sunlight hits the surface at a low angle, casting dramatic shadows that reveal craters, mountains, and valleys in stunning three-dimensional detail. First quarter moon is ideal for evening observing, while last quarter moon is best for pre-dawn sessions.
Why does the full moon look flat?
At full moon, sunlight hits the lunar surface almost directly from the observer’s perspective. This head-on lighting eliminates shadows, making craters, mountains, and ridges appear flat and featureless. Without angled light to create shadows, the surface loses all depth perception and looks like a bright, uniform disc.
What is the lunar terminator?
The lunar terminator is the dividing line between the illuminated and dark portions of the moon. It is the line of sunrise or sunset on the lunar surface. Along the terminator, sunlight strikes the surface at a very low angle, producing long shadows that reveal craters, mountains, and other features in maximum three-dimensional detail.
Can you see the Apollo landing sites with a telescope?
No, the Apollo landing equipment cannot be seen from Earth, even in the largest telescopes. The descent stages left on the moon are only about 10 feet across, and at 240,000 miles away, they are far too small to resolve. However, you can identify the landing locations and observe the surrounding terrain that the astronauts explored.
Do I need a moon filter for telescope viewing?
A moon filter is helpful when observing near full moon, when the brightness can cause eye strain. However, during the first and last quarter phases, which are the best times for observation, a filter is usually unnecessary. If you buy one, choose a variable polarizing filter so you can adjust the brightness to match the phase and magnification.
Can you see the moon during the day?
Yes, the moon is visible during the day for much of each month, except near new moon and full moon. The best daytime viewing occurs during the first and last quarter phases, when the moon is about 90 degrees from the sun and high enough above the horizon to stand out against the bright sky.
What magnification is best for observing the moon?
For most lunar observation, 75x to 150x is ideal. At this range, crater detail is excellent and the image remains bright and sharp. At 30x to 50x, you can see the entire moon for context. At 150x to 200x, you can study fine detail along the terminator when atmospheric conditions are steady. Avoid using more than 250x unless conditions are exceptional.
Does the moon affect vertigo?
There is no scientific evidence that the moon directly causes or affects vertigo. Some people report feeling symptoms during full moon periods, but studies have not found a causal link between lunar phases and vertigo, dizziness, or other vestibular conditions. Any perceived connection is likely coincidental.
Conclusion
The next time someone tells you to wait for the full moon to explore the lunar surface, you will know better. The best time to view the moon is during its first and last quarter phases, when the terminator sweeps across the surface and paints every crater, mountain, and valley with dramatic shadows.
Start with binoculars during a first quarter moon, focus your attention on the terminator line, and prepare to be amazed. The flat, featureless disc you have seen at full moon is not the real moon. The real moon is a rugged, three-dimensional world waiting to be explored, one shadow at a time.
Grab a moon app, find the next first quarter date, and step outside. Once you see the moon the right way, you will never look at a full moon the same way again.